
Building an E-commerce Test Site with WordPress & WooCommerce
A complete guide to creating a local WordPress site for API, SQL, and frontend testing practice
Why Set Up a Local WordPress Testing Environment?
A local WordPress testing environment is essential for practicing automation testing safely and efficiently. It provides a controlled space where you can experiment without affecting a live site.
Testing Benefits
- API Testing: Full access to WordPress REST API endpoints
- SQL Practice: Direct database access for to execute SQL queries
- UI Testing: Stable environment for frontend automation
- Data Control: Freedom to create, modify, and reset test data
Local Setup Advantages
- No Costs: Free to set up and use
- Full Control: Admin access to all features
- Fast Response: No internet latency
- Safe Testing: No risk to production data
Before You Start:
- Choose one server stack option (MAMP, XAMPP, or Docker) - MAMP is recommended.
- Make sure you have admin rights on your computer
- Have at least 1GB of free disk space
Step 1: Install Server Stack
A server stack provides the necessary environment (web server, database, PHP) to run WordPress locally. Choose one of the following options based on your comfort level:
- MAMP: Recommended for beginners, easy setup (Mac & Windows)
- XAMPP: Popular alternative, similar to MAMP (Mac & Windows)
- Docker: Advanced option, requires Docker knowledge
Option 1: MAMP (Recommended)
Installation Steps:
- Download MAMP (free version) from official website
- During installation:
Windows Users:
Unselect "MAMP PRO" and "MAMP Viewer" components when prompted
Mac Users:After installation, use MAMP (not MAMP PRO) from Applications folder
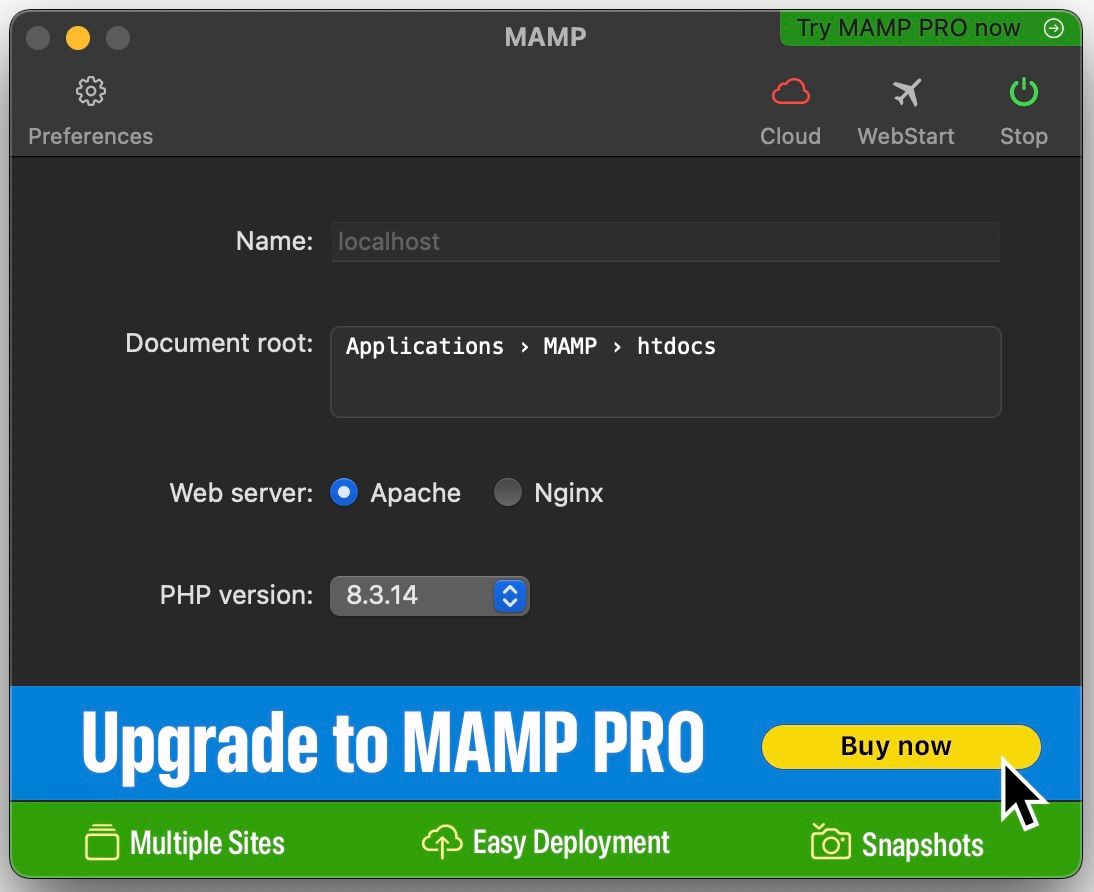
Starting MAMP Servers
MAMP needs two servers running: Apache (web server) and MySQL (database server). Both must be running to use WordPress.
- Look for the power icon in the MAMP window
- Click it to start both servers
- When running:
- The icon will be lit green
- The button will say "Stop"
- Both servers are controlled by this single button
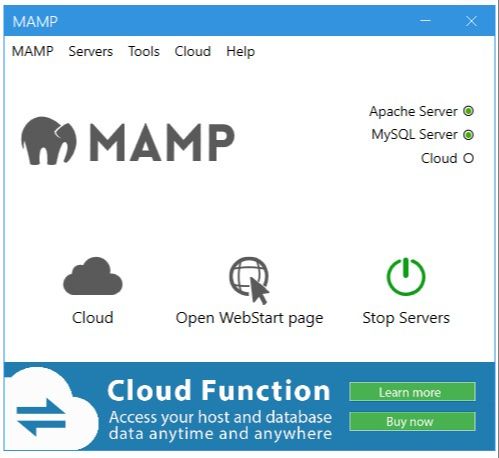
- Look for the server indicators in the control panel
- Click "Start Servers" to start both servers
- When running:
- Both Apache and MySQL indicators will be green
- You can ignore the "Cloud" indicator
Troubleshooting:
- If servers won't start, make sure no other applications are using ports 8888 or 8889
- For Windows users: Try running MAMP as administrator if you have permission issues
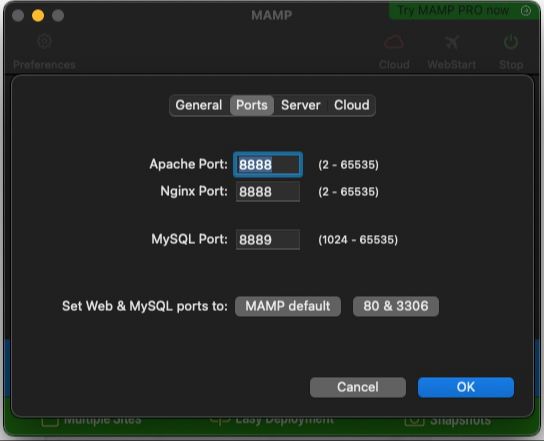
Configuring MAMP Ports
MAMP uses specific ports for its web server (Apache) and database server (MySQL). We'll set these up now to avoid conflicts with other applications.
Required Port Settings:
- Apache Port: 8888
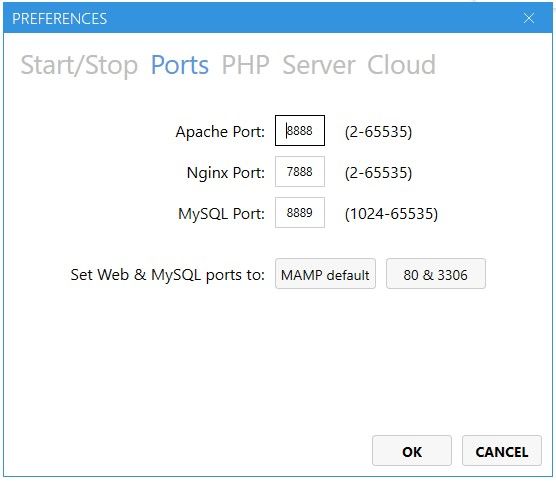
Windows Note:
Default is 80 - Click "Use MAMP default ports" to change it to 8888
- MySQL Port: 8889
Windows Note:
Default is 3306 - Click "Use MAMP default ports" to change it to 8889
Important:
- Note down these port numbers - you'll need them when setting up WordPress
- Your local site will be accessible at:
http://localhost:8888 - MySQL connection will use:
127.0.0.1:8889
How to Change Ports:
Click on "Preferences" which opens a new window. Click on "Ports" tab and select "MAMP default".
Click on "MAMP → Preferences → Ports" and use the "MAMP default ports" button
Option 2: XAMPP
XAMPP is another popular option that provides Apache, MySQL, and PHP. It works similarly to MAMP but uses different default ports.
Installation Steps:
- Download XAMPP from Apache Friends website
- Run the installer (both Mac and Windows versions available)
- Select at least these components:
- Apache
- MySQL
- PHP
- phpMyAdmin
Important Port Information:
- Apache (Web Server): Port 80
- Your site will be accessible at:
http://localhost
- Your site will be accessible at:
- MySQL: Port 3306
- Database connection will use:
127.0.0.1:3306
- Database connection will use:
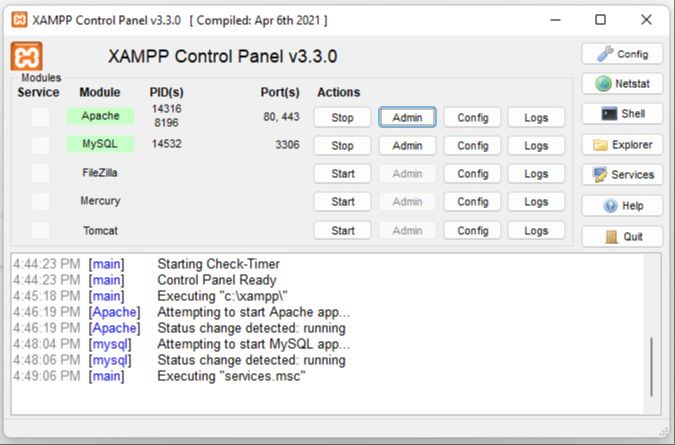
Starting the Servers:
Follow these steps:
- Open XAMPP Control Panel
- Click "Start" next to Apache
- Click "Start" next to MySQL
- Both should show "Running" with green indicators
Option 3: Docker Desktop (Advanced)
Docker provides a containerized solution that ensures consistent environments across different computers. While it requires more technical knowledge, it offers better isolation and easier cleanup.
Installation Steps:
- Download Docker Desktop:
Mac Users:
Visit Docker Desktop for Mac
Windows Users: - Run the installer for your platform
- Start Docker Desktop and wait for the engine to start running
System Requirements:
- Windows: Windows 10/11 Pro, Enterprise, or Education (WSL2 recommended)
- Mac: macOS 10.15 or newer
- At least 4GB of RAM
- Virtualization must be enabled in BIOS (Windows)
Once Docker Desktop is installed, we'll use it later to run WordPress in containers. The actual WordPress setup will be handled through a docker-compose file, which we'll provide in the WordPress installation section.
Step 2: Install WordPress
Now that you have a local server environment running, let's set up WordPress. We'll cover two methods:
- MAMP/XAMPP Method: Manual installation (recommended for beginners)
- Docker Method: Using docker-compose (for advanced users)
Option 1: Installing WordPress on MAMP/XAMPP
Overview of Steps:
- Download WordPress files
- Set up the site folder
- Create a database
- Run the WordPress installer
Before You Start:
- Make sure your servers are running (Apache and MySQL)
- Note your port numbers from the previous setup
- Have your document root location ready
- Close any applications using port 8888 (MAMP) or 80 (XAMPP)
Downloading and Setting Up WordPress Files
Step 1: Get WordPress Files
- Download WordPress from wordpress.org
- Extract the downloaded zip file
- You'll get a folder named "wordpress" containing all required files
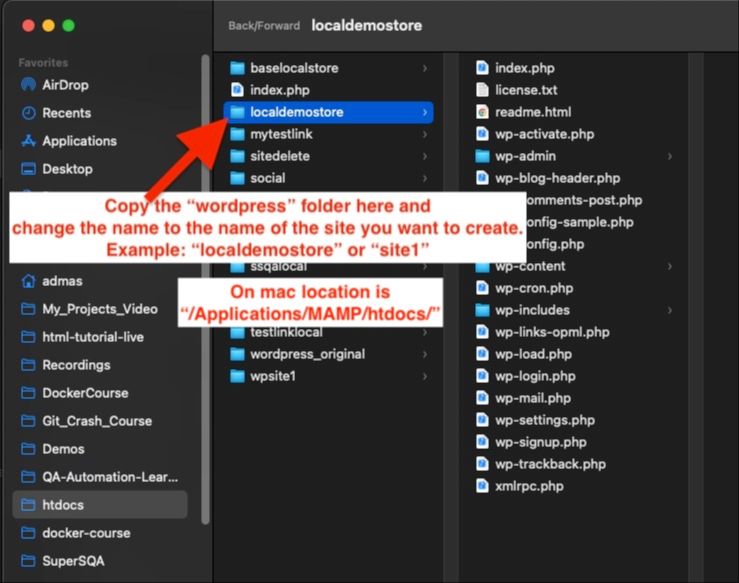
Step 2: Place Files in Document Root
Move the extracted files to your server's document root location (You are not sure the location you can get this info under the settings of MAMP):
- Mac:
/Applications/MAMP/htdocs/ - Windows:
C:\MAMP\htdocs\
- Mac:
/Applications/XAMPP/htdocs/ - Windows:
C:\xampp\htdocs\
Important Folder Naming:
- Rename the "wordpress" folder to your desired site name
- Example: rename to "mysite1"
- Your site will be accessible at:
- MAMP:
http://localhost:8888/mysite1 - XAMPP:
http://localhost/mysite1
- MAMP:

Verifying WordPress Files Setup
Check Your Installation:
- Open your web browser
- Navigate to your site URL based on your folder name:
For MAMP:
If your folder is "mysite1", your URL will be:
http://localhost:8888/mysite1For XAMPP: (if it is using port 80 for Apache)If your folder is "mysite1", your URL will be:
http://localhost/mysite1 - You should see the WordPress installation welcome screen
- If you see a directory listing instead of the installer, make sure you copied all files correctly
Creating WordPress Database
Before running the WordPress installer, you need to create a database. We'll use phpMyAdmin which is already available in your MAMP or XAMPP dashboard.
Step 1: Access phpMyAdmin
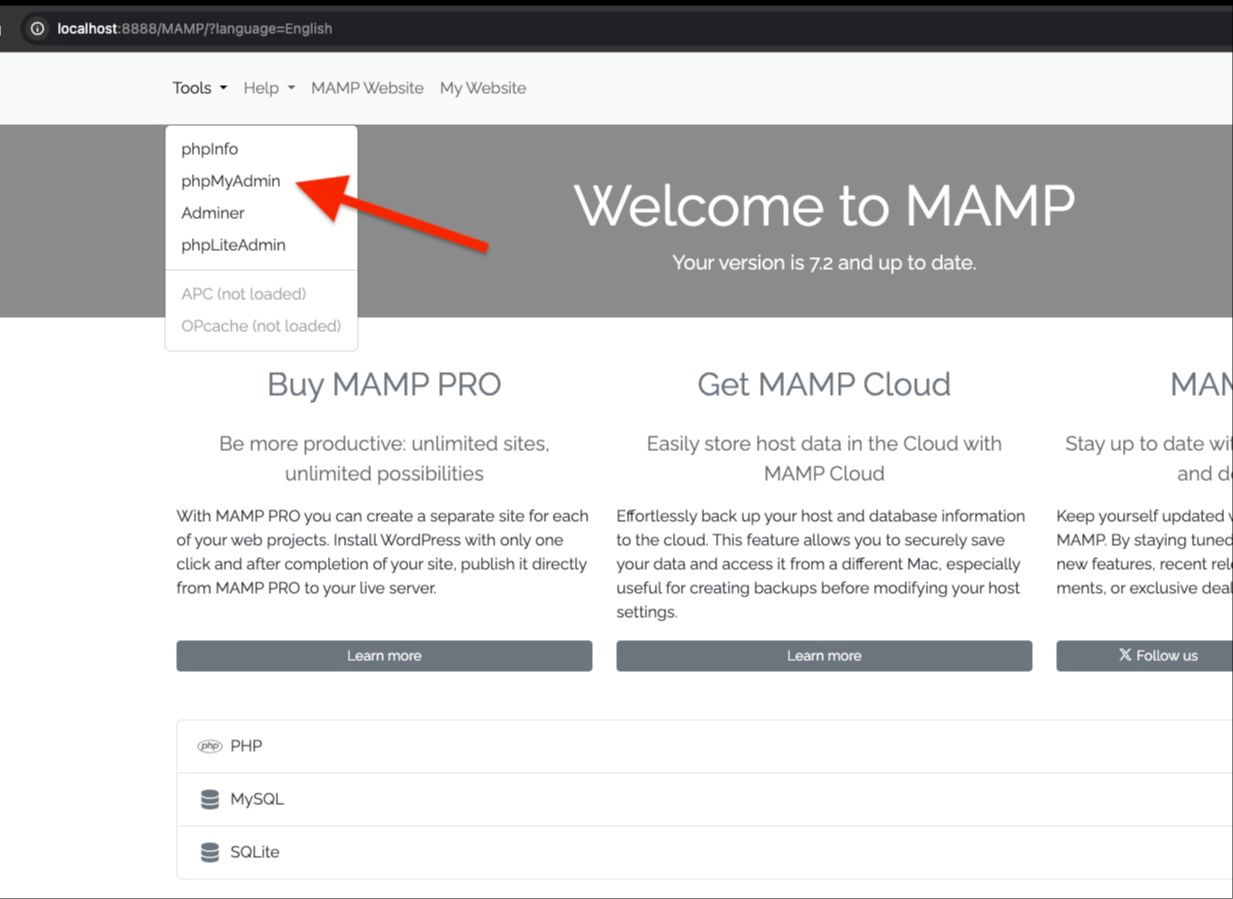
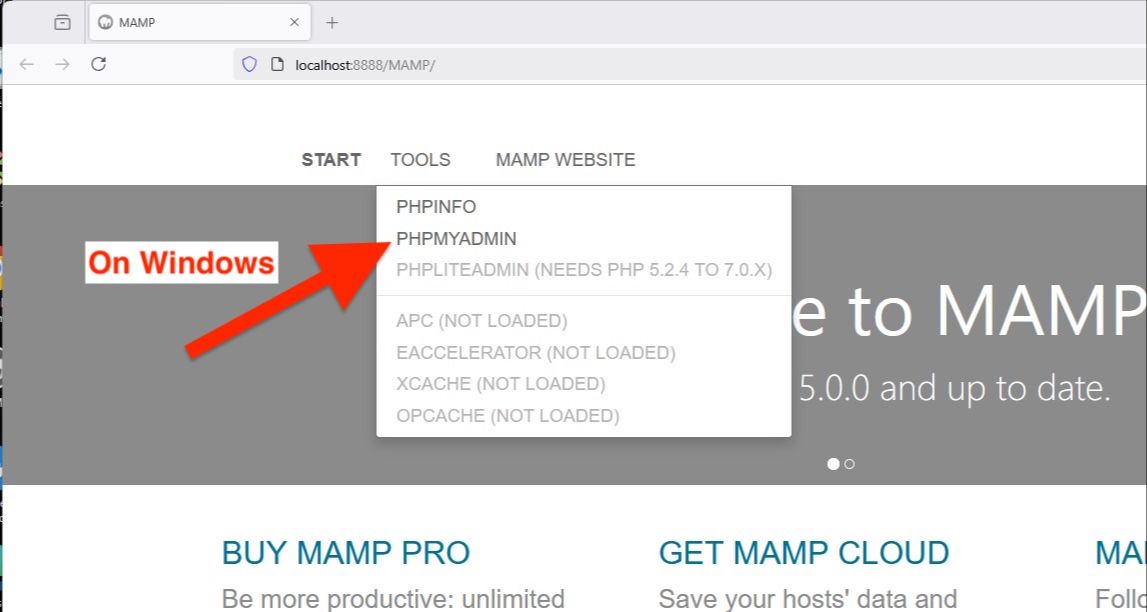
- Click "Go to Application" (Mac) or "Open WebStart page" (Windows)
- Click on the phpMyAdmin link in the dashboard
- Click "Admin" next to MySQL in the control panel (Windows) or "Go to Application" on (Mac)
- This will open the dashboard and there is a link for "phpMyAdmin" directly
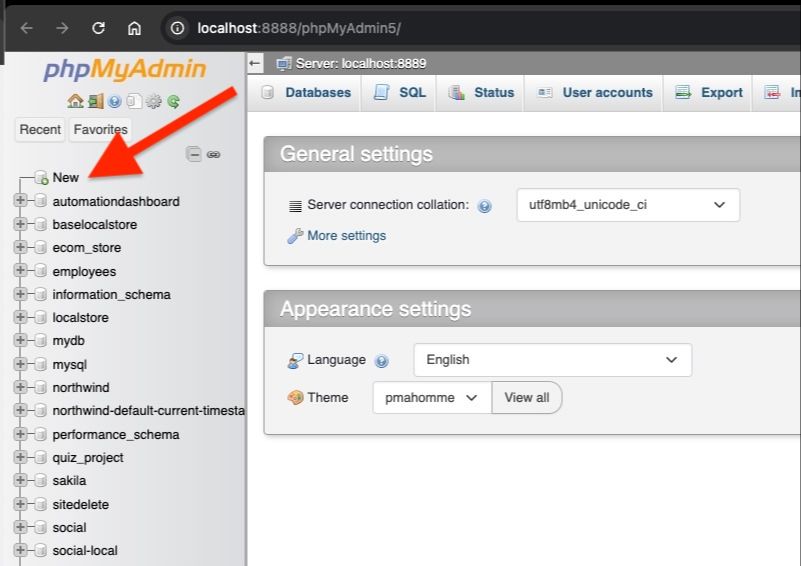
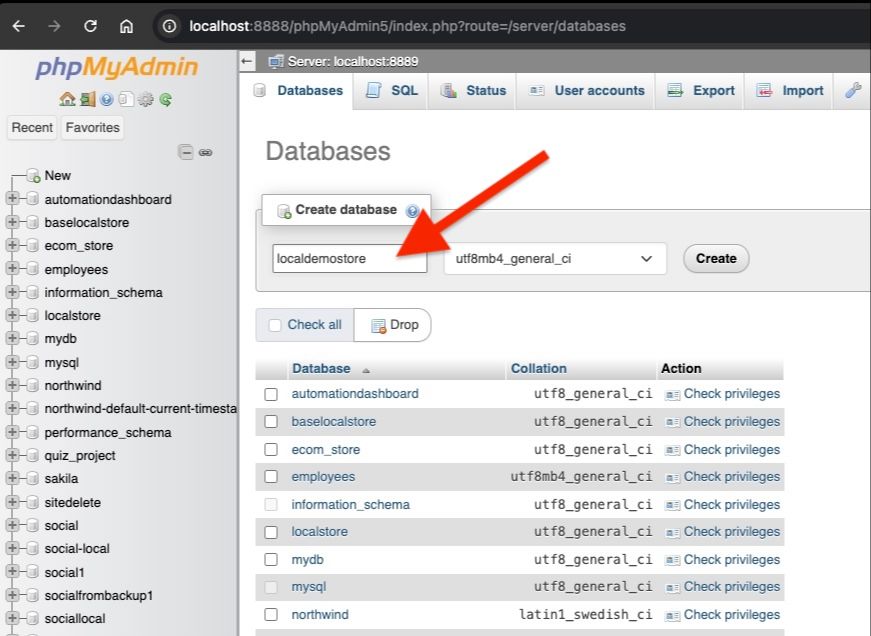
Step 2: Create Database
- Click "New" in the left sidebar
- Enter the same name you used for your site folder (example: if your site folder is "mysite1", use "mysite1" for the database)
- Click "Create"
Important Database Details:
Save these details - you'll need them in the WordPress installer:
- Database Name: same as your site folder name
- Username: root
- Password: root (MAMP) or empty (XAMPP)
- Database Host:
- MAMP:
127.0.0.1:8889 - XAMPP:
localhost
- MAMP:
WordPress Installation
Now that we have our database ready, let's run the WordPress installer.
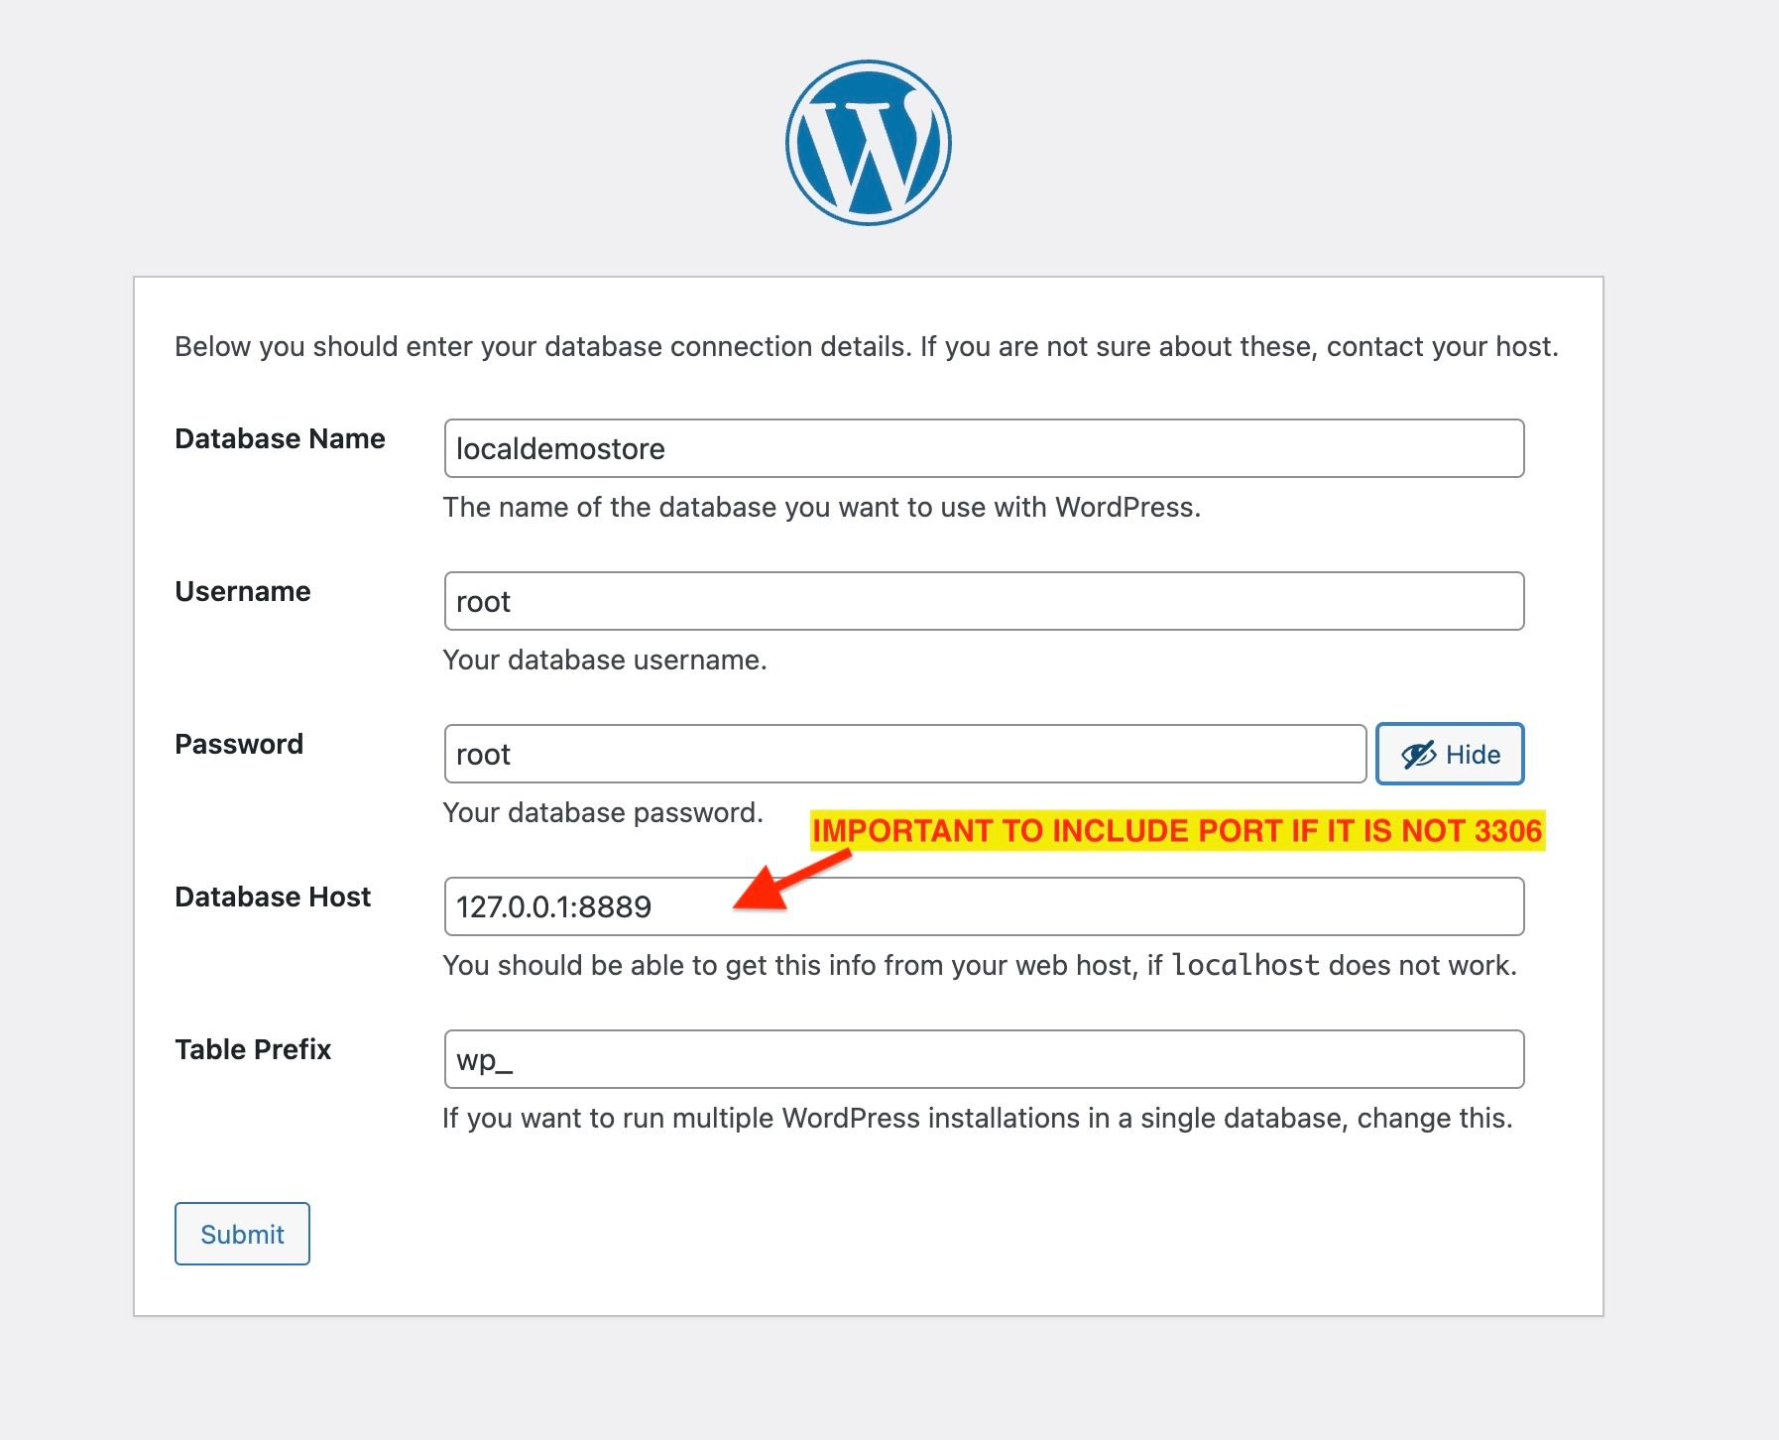
Step 1: Database Configuration
- Click "Let's go!" on the welcome screen
- Enter your database connection details:
For MAMP:
- Database Name: your site folder name
- Username: root
- Password: root
- Database Host: 127.0.0.1:8889 (port number is required!)
- Table Prefix: wp_ (leave as default)
For XAMPP:- Database Name: your site folder name
- Username: root
- Password: (leave empty)
- Database Host: 127.0.0.1 (uses default port 3306)
- Table Prefix: wp_ (leave as default)
- Click "Submit"
Important Note About Database Host:
If your MySQL is not using the default port (3306), you must include the port number in the Database Host field like this: 127.0.0.1:PORT
This is why MAMP users must use 127.0.0.1:8889
On the next screen, click "Run the installation" to proceed with setting up your WordPress site.
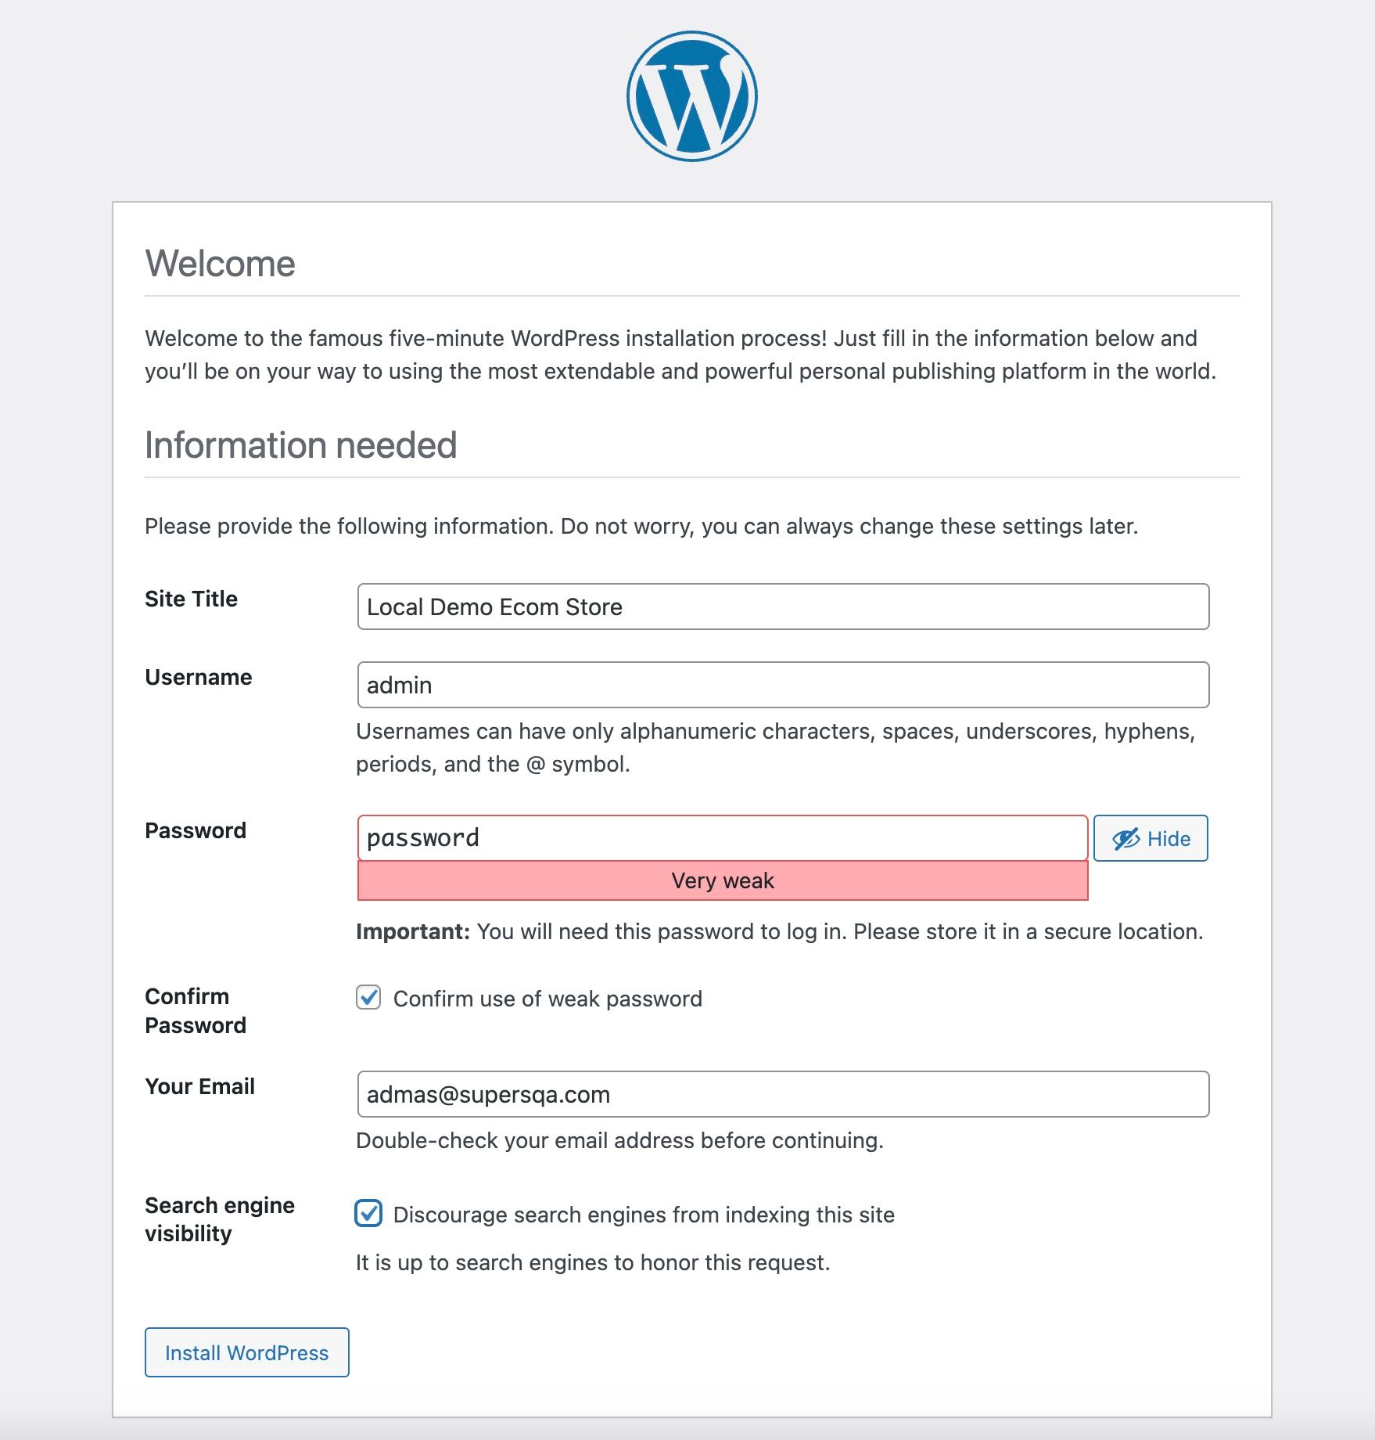
Setting Up WordPress Admin User
After database configuration, you'll see the main WordPress setup screen where you'll create your admin account.
Site Information
- Site Title: Enter any title (you can change this later)
- Admin Username: Use "admin" (this is fine for local testing)
- Password: Use "password" (simple password for local development)
- Email: Enter any email (it won't send actual emails)
- Search Engine Visibility: It does not matter her but you can check it
Important Note:
We're using simple credentials (admin/password) because this is for local development only. Never use these credentials on a live site!
Next Steps:
- Click "Install WordPress"
- Wait for installation to complete
- Click "Log In" when prompted
- You'll be taken to the WordPress dashboard after logging in
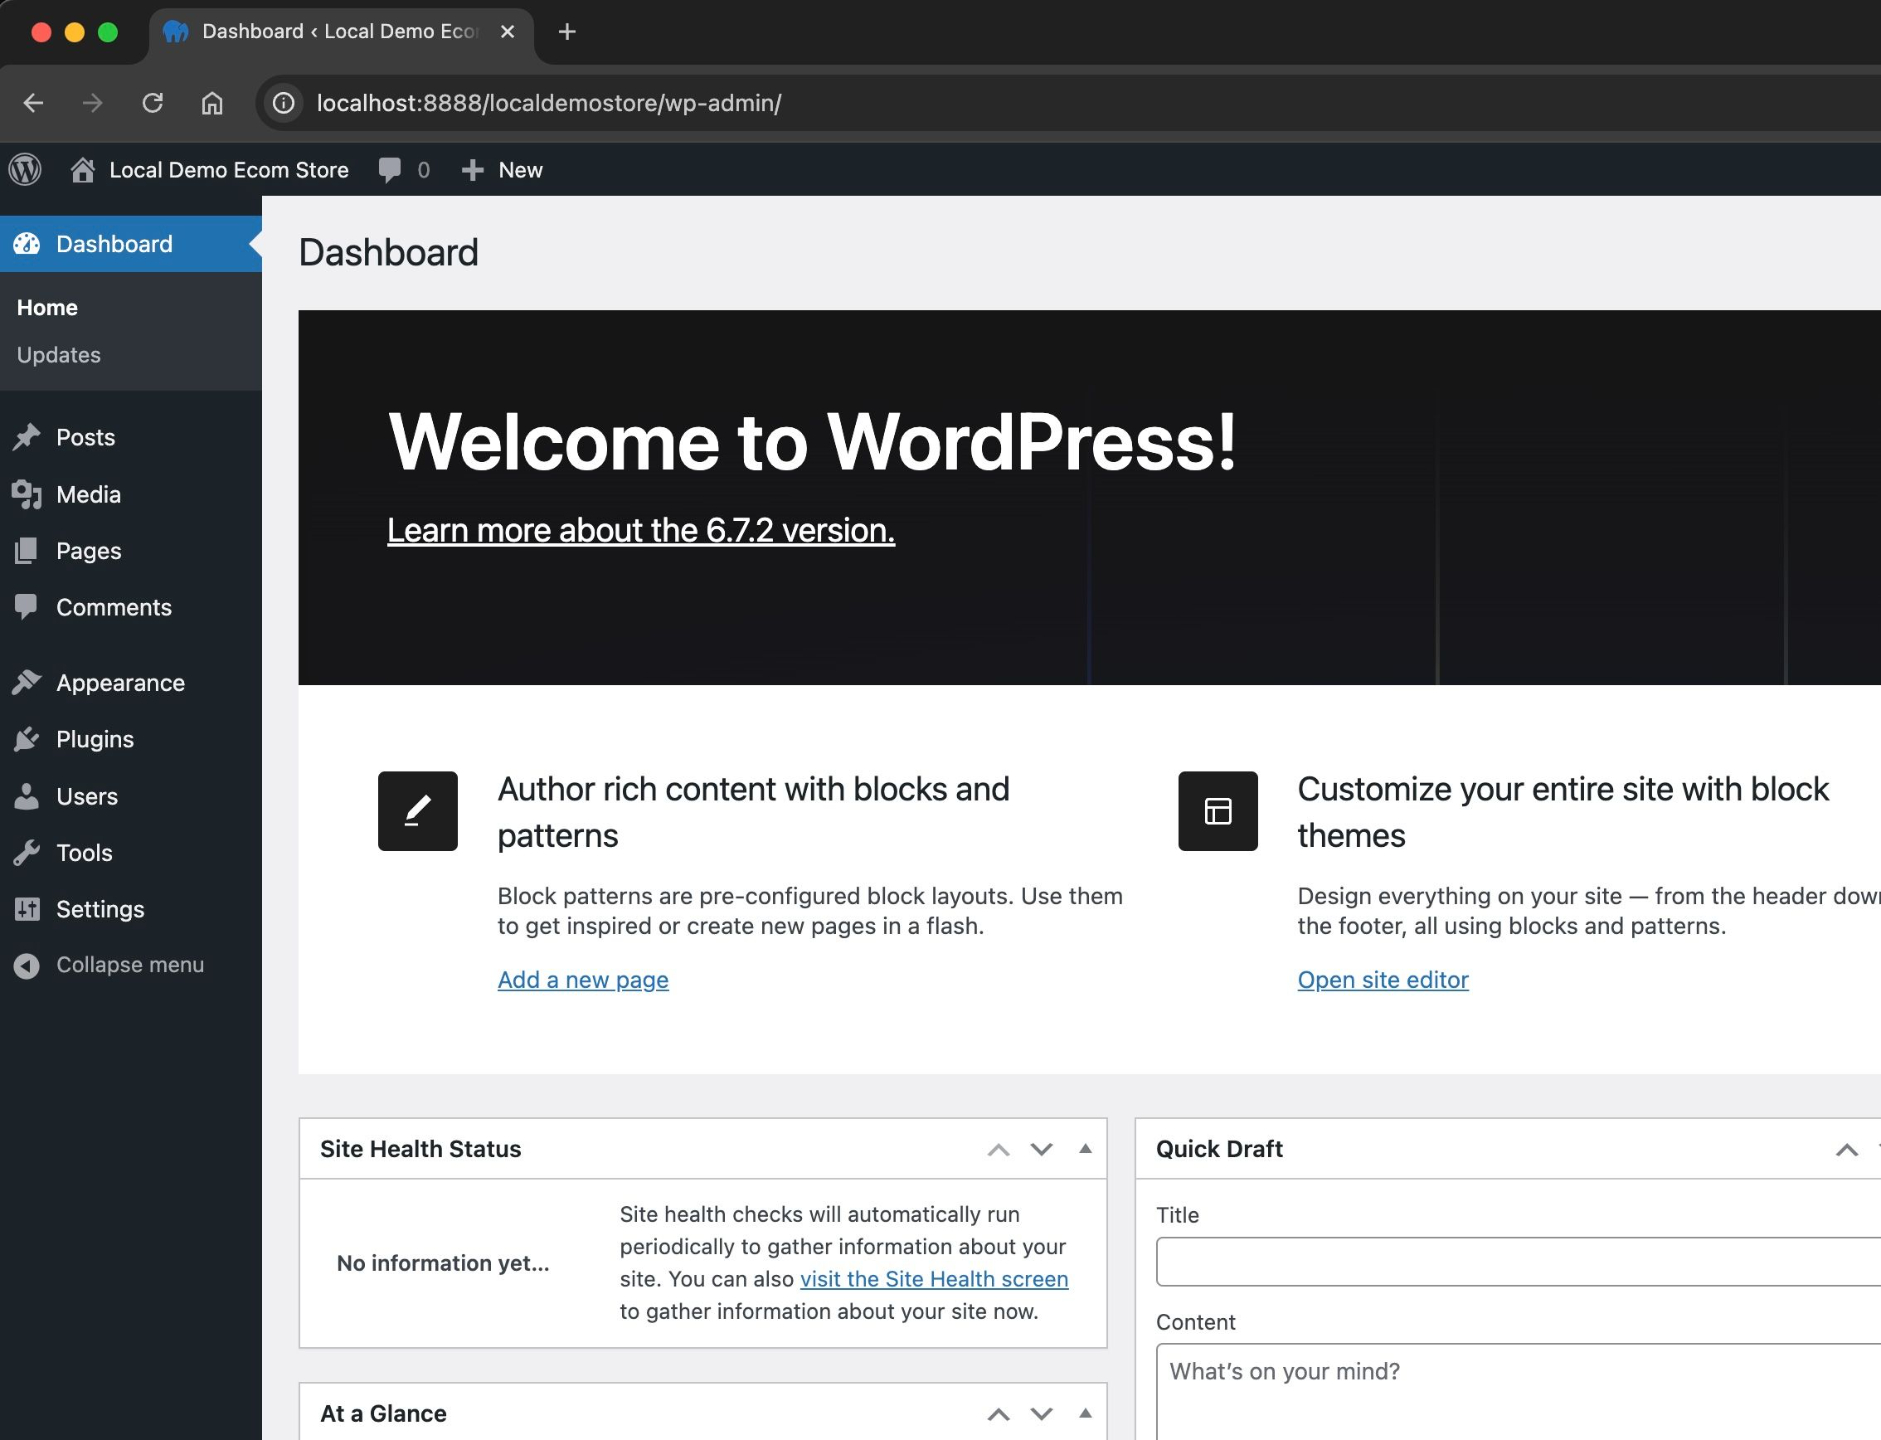
🎉 Congratulations!
You now have a working WordPress installation on your local machine. You can:
- Access your site at:
http://localhost:8888/mysite1(MAMP) orhttp://localhost/mysite1(XAMPP) - Login to admin dashboard by adding /wp-admin to your site URL
- Use admin/password to log in
- You have full access to Database & API
Option 2: Installing WordPress with Docker
Docker provides a simpler way to set up WordPress with all dependencies included. We'll use docker-compose to set up both WordPress and MySQL containers.
Note: If you're following the course and want to set up the exact demo store environment, you can skip this basic setup and use our pre-configured Docker images from our GitHub repository. We'll cover this in detail in the e-commerce setup section.
Step 1: Create Project Folder
- Create a new folder for your WordPress site
- Example: Create folder named "mysite1"
- This will contain your docker-compose file and WordPress data
Step 2: Create docker-compose.yml
Create a new file named docker-compose.yml in your project folder with this content:
version: '3'

services:
  db:
    image: mysql:5.7
    volumes:
      - db_data:/var/lib/mysql
    restart: always
    environment:
      MYSQL_ROOT_PASSWORD: somewordpress
      MYSQL_DATABASE: wordpress
      MYSQL_USER: wordpress
      MYSQL_PASSWORD: wordpress

  wordpress:
    depends_on:
      - db
    image: wordpress:latest
    ports:
      - "8080:80"
    restart: always
    environment:
      WORDPRESS_DB_HOST: db:3306
      WORDPRESS_DB_USER: wordpress
      WORDPRESS_DB_PASSWORD: wordpress
      WORDPRESS_DB_NAME: wordpress
    volumes:
      - wp_data:/var/www/html

volumes:
  db_data: {}
  wp_data: {}
Important Notes:
- Make sure Docker Desktop is running before proceeding
- Your WordPress site will be available at
http://localhost:8080 - Database credentials are defined in the compose file
Step 3: Run WordPress with Docker
Now that we have our configuration file ready, let's start the containers.
Starting the Containers:
- Open terminal/command prompt
- Navigate to your project folder:
cd path/to/mysite1 - Run this command to start WordPress:
docker-compose up -d - Wait for containers to start (this may take a few minutes first time)
Verify Installation:
- Open your browser and visit:
http://localhost:8080 - You should see the WordPress installation screen
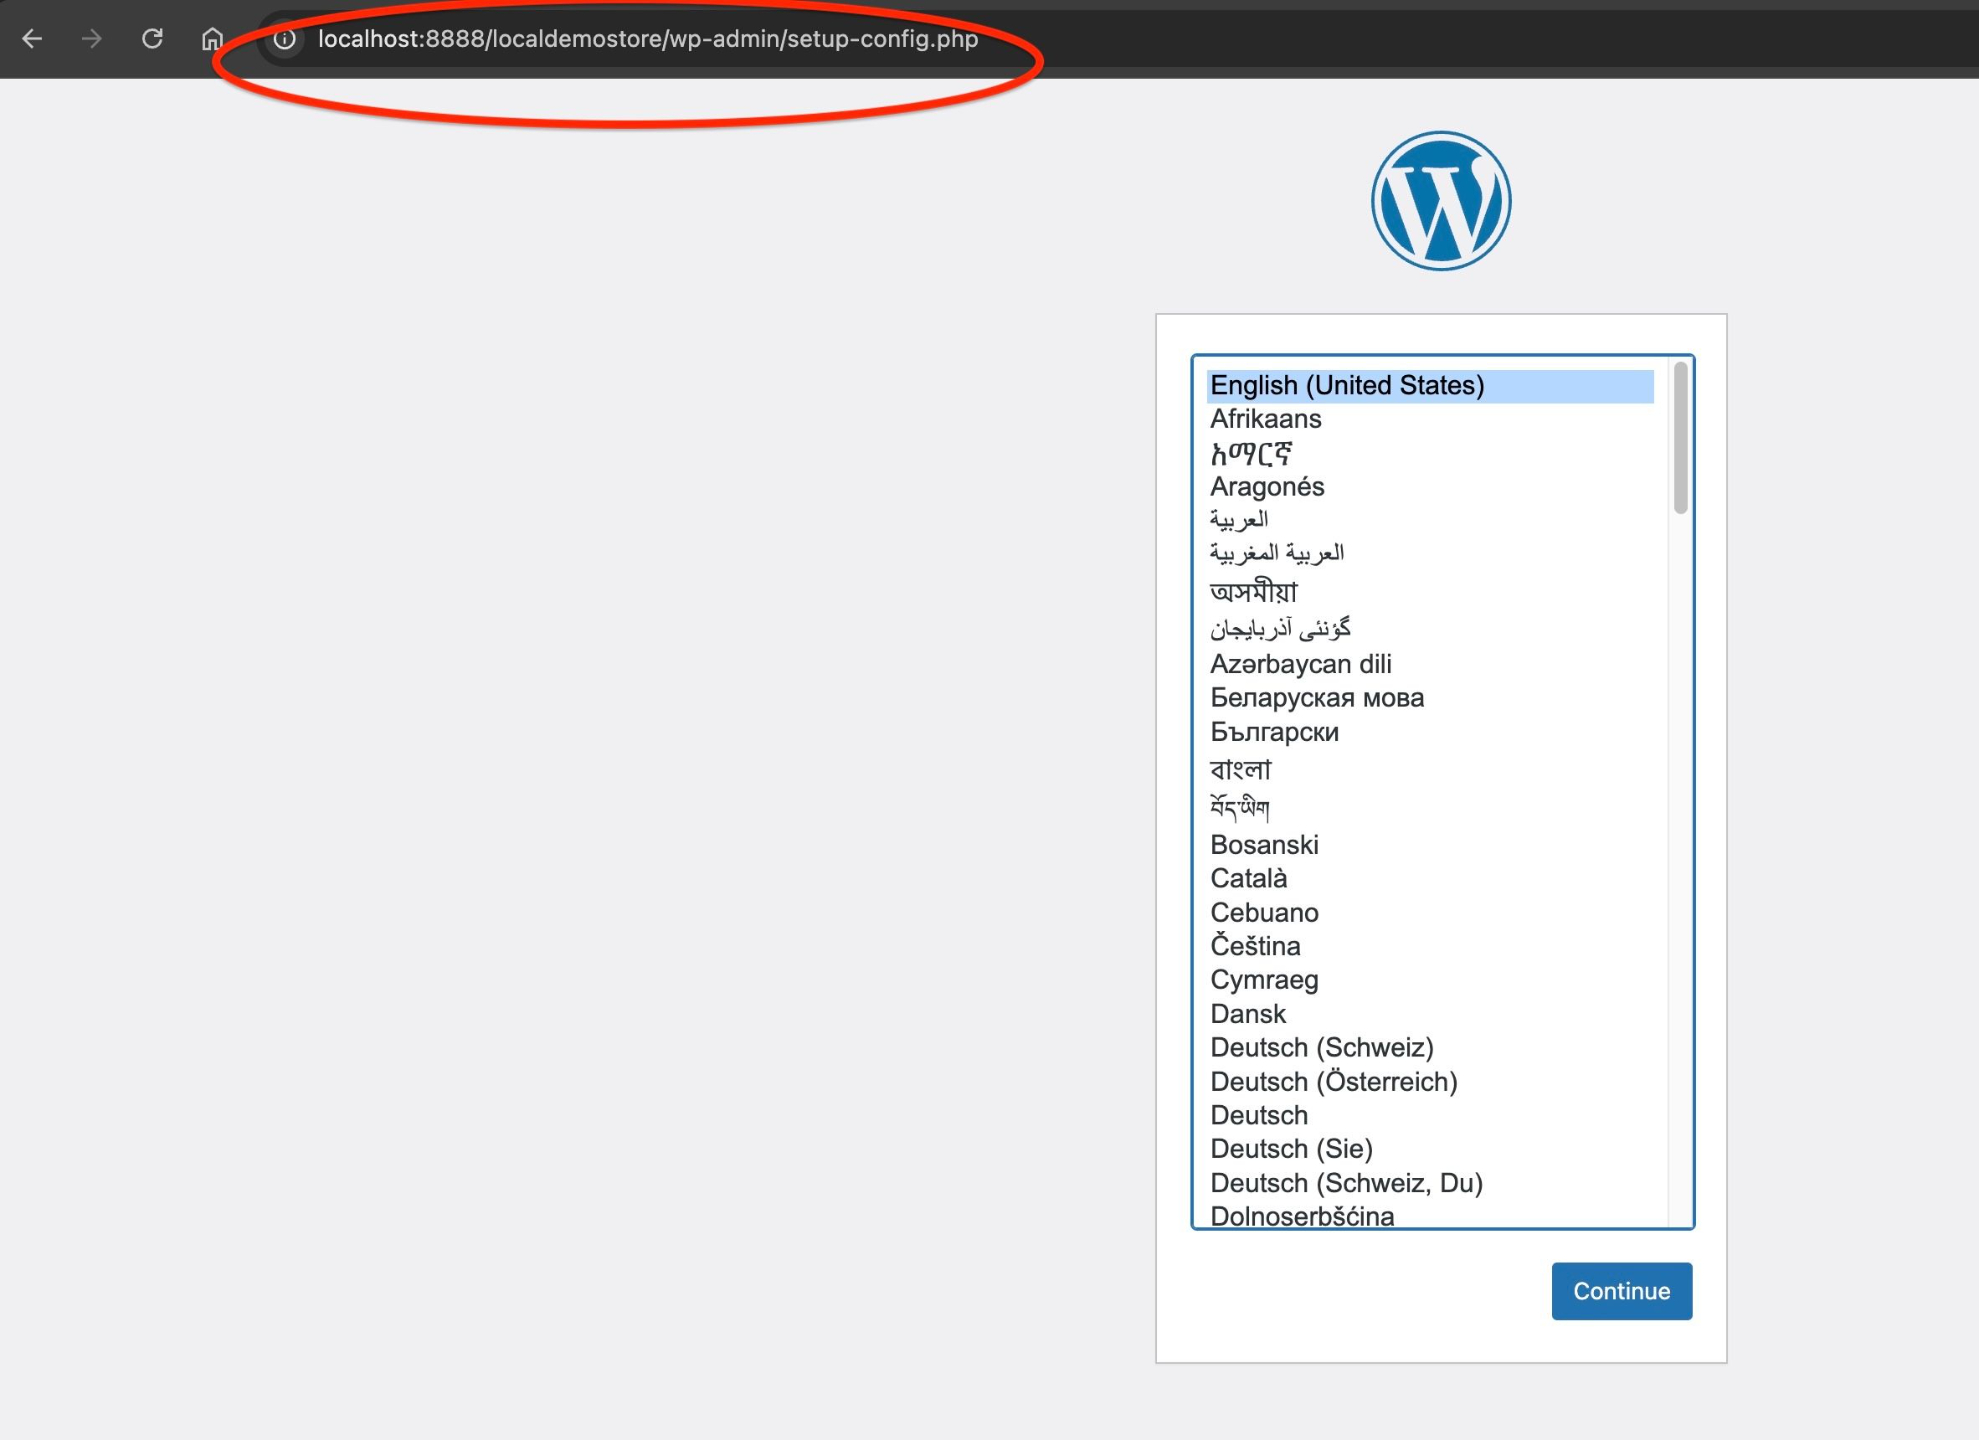
- Follow the same WordPress setup steps as before:
- Choose your language
- Create admin account (admin/password)
- Complete the installation
Useful Docker Commands:
docker-compose down- Stop and remove containersdocker-compose stop- Just stop containers (keep data)docker-compose start- Start existing containers
Step 3: Configure WordPress for E-Commerce
Now that you have a working WordPress site, we need to transform it into an e-commerce platform. This requires:
- Installing WooCommerce plugin
- Setting up a compatible theme
- Configuring various shop settings
Two Ways to Set Up Your Store:
Option 1: Use SuperSQA's Pre-Configured Site (Recommended)
- Fastest way to get started
- Matches exactly with course examples
- Includes all necessary plugins and configurations
Option 2: Manual Configuration
- Build the store from scratch
- Learn detailed WooCommerce setup
- More time-consuming
- May have slight differences from course examples
Important Note:
For the best course experience, we strongly recommend using Option 1 (Pre-Configured Site). This ensures your test environment matches the course examples exactly, making it easier to follow along with automation exercises.
Option 1: Restoring Pre-Configured Site
First, we'll install the WPvivid plugin to restore the SuperSQA demo store backup.
Step 1: Download Demo Store Backup
Step 2: Access WordPress Dashboard
- Go to your site's admin URL:
MAMP:
http://localhost:8888/mysite1/wp-adminXAMPP:http://localhost/mysite1/wp-admin - Login with your admin credentials:
- Username:
admin - Password:
password
- Username:
Step 3: Install WPvivid Plugin
- In the dashboard, go to Plugins → Add New
- Search for:
WPvivid Backup & Migration - Click Install Now next to "Migration, Backup, Staging – WPvivid Backup & Migration"
- After installation completes, click Activate
Important:
- Make sure you install the free version of WPvivid
- The plugin name should be exactly: "Migration, Backup, Staging – WPvivid Backup & Migration"
- Don't restore the backup yet - we'll do that in the next step
Restoring the Demo Store Backup
Now that WPvivid is installed and you have the backup file, let's restore the demo store.
Step 1: Access WPvivid Settings
- In the WordPress dashboard, go to Plugins
- Find "WPvivid Backup Plugin" in the list
- Click Settings under the plugin name
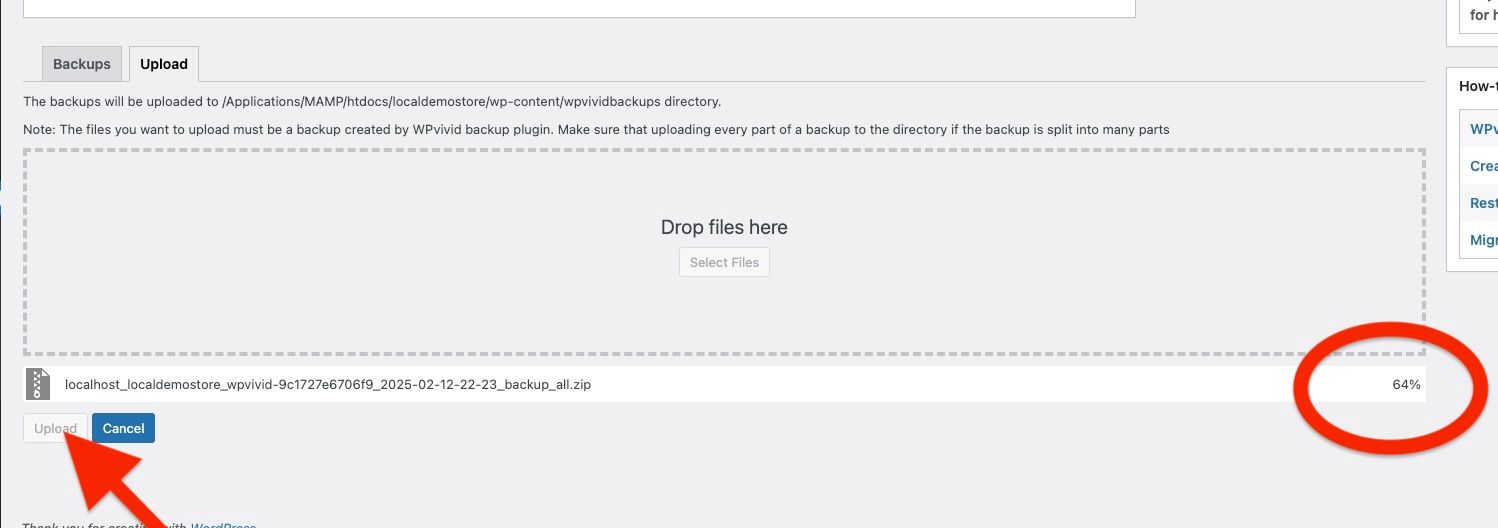
Step 2: Upload Backup File
- Scroll down to the bottom half of the settings page
- Click the Upload button
- Select the demo store backup file you downloaded earlier
- Wait for the upload to complete
- You'll see a progress percentage during upload
- A popup will confirm when upload is finished
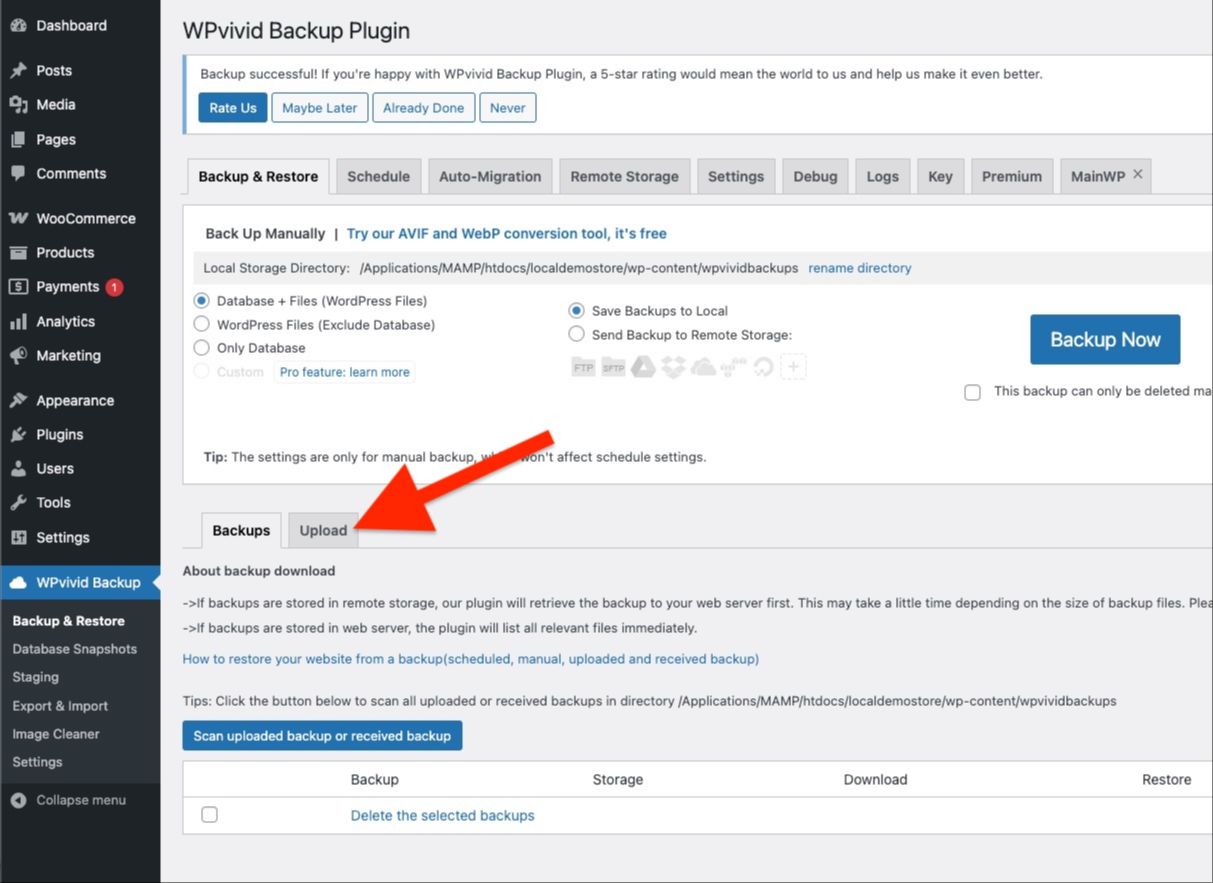
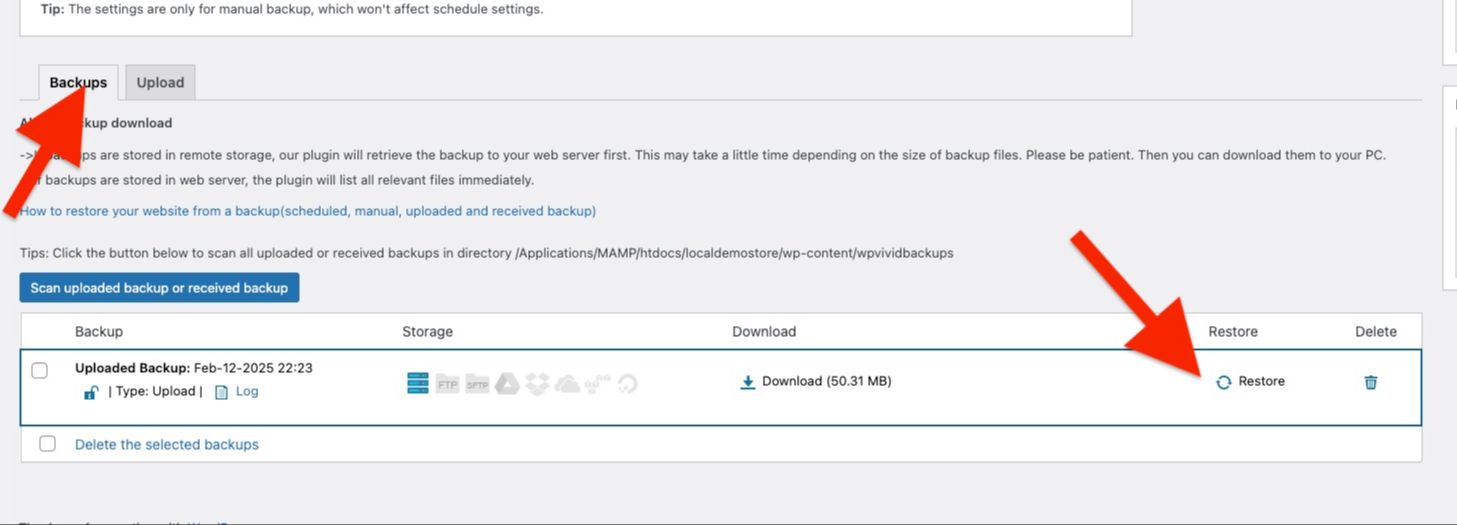
Complete the Restoration
Step 3: Restore Backup
- Click on the Backups tab
- Find your uploaded backup in the list
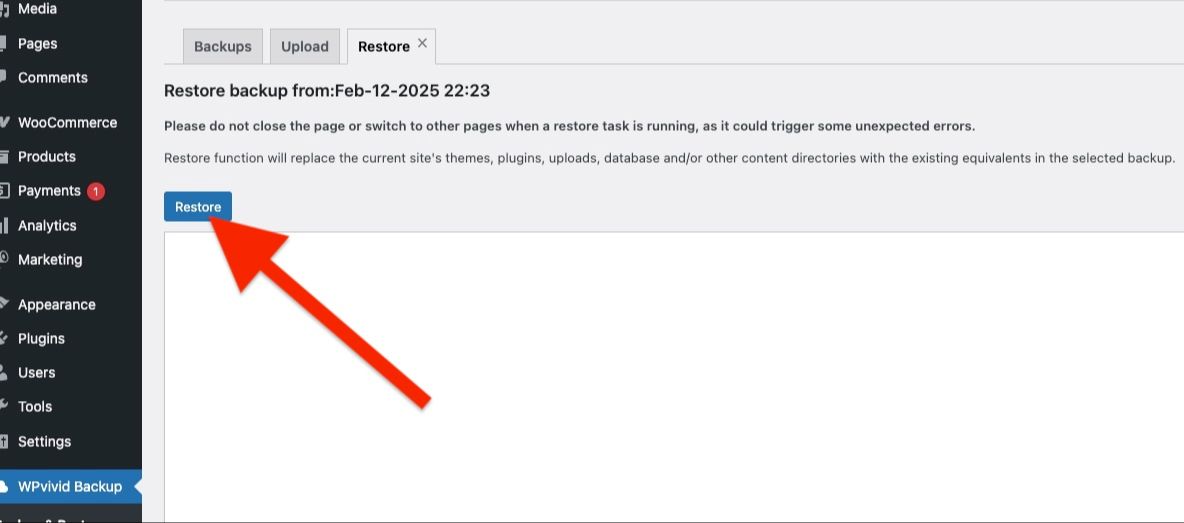
- Click the Restore button
- Acknowledge the warning popup
- This will replace your current site content
- The process may take several minutes
Important Notes:
- Don't close your browser during the restore process
- The restoration will replace ALL current content
- You may need to log in again after restoration completes
After Restoration
When the restoration completes, you'll be automatically logged out. This is normal as the backup includes its own user database.
Log In to Your Restored Site
- Go back to your login page:
MAMP:
http://localhost:8888/mysite1/wp-adminXAMPP:http://localhost/mysite1/wp-admin - Use these credentials:
- Username:
admin - Password:
password
- Username:
Important:
These are the credentials from the backup file. Your previous admin password is no longer valid as it has been replaced by the restored database.
🎉 Congratulations!
You now have a fully configured e-commerce site that matches the course environment.
Final Step: Create API Keys
To use this site for API testing, you'll need to create API credentials:
- In the WordPress dashboard, go to WooCommerce → Settings
- Click the Advanced tab
- Select REST API
- Click Add key to create new API credentials
- Description: "Testing API Key" (or any name you prefer)
- User: admin
- Permissions: Read/Write
- Save these credentials - you'll need them for API testing:
- Consumer Key
- Consumer Secret
Important:
Make sure to copy and save your API credentials immediately after creation. The secret key will only be shown once and cannot be retrieved later.
Option 2: Manual Store Configuration
This guide walks you through setting up your WooCommerce store from scratch. While more time-consuming than using the backup, this helps understand each component.
1. Essential Installation
- Install and activate theme "Storefront"
- Go to Appearance → Themes → Add New
- Search for "Storefront"
- Click Install, then Activate
- Install and activate WooCommerce plugin
- Go to Plugins → Add New
- Search for "WooCommerce"
- Click Install, then Activate
2. Basic WordPress Settings
- Configure Permalinks
- Go to Settings → Permalinks
- Select "Post name"
- Save Changes
- Set up Homepage
- Go to Settings → Reading
- Select "A static page"
- Set Homepage to "Shop"
- Save Changes
- Enable User Registration
- Go to Settings → General
- Check "Anyone can register"
- Save Changes
3. WooCommerce Configuration
- Make Site Live
- Go to WooCommerce → Settings
- Find "Site visibility"
- Select "Live"
- Configure Account Settings
- Go to WooCommerce → Settings → Accounts & Privacy
- Under "Account Creation", select "On 'My account' page"
- Uncheck "Send password setup link"
- Save Changes
4. Import Sample Products
- Download WooCommerce from wordpress.org
- Extract the zip file
- Go to WooCommerce → Settings → Import
- Follow the official import instructions
5. Add Promotional Banner
- Install "WPFront Notification Bar" plugin
- Go to Plugins → Add New
- Search for "WPFront Notification Bar"
- Install and Activate
- Configure Banner Settings
- Check "Enabled"
- Set "Display after" to 1 minute
- Set content to:
<strong>Free shipping on orders over $50</strong> - Exclude pages: "my account" and "sample page"
- Set Bar Color to:
#e81276 - Set Text Color to:
#e81276
Next Steps:
After completing these steps, don't forget to create your API keys as described in the previous section.
Ready for Testing! 🚀
Whether you chose the backup restoration or manual setup, you now have a fully functional WooCommerce site ready for API testing.
Quick Reference
- Site URL:
http://localhost:8888/mysite1(MAMP) orhttp://localhost/mysite1(XAMPP) - Admin Login:
admin/password - Admin Dashboard: Add
/wp-adminto your site URL
Next Steps
- Make sure your API keys are created and saved
- Test your site's frontend to ensure all features work
- Try creating a test order to verify checkout process
- You're now ready to start the API testing sections of the course!
Need Help?
If you encounter any issues, check the course Q&A section or reach out through the course discussion board or send an email to "[email protected]".